116185257769349557
前言
Apache Maven,是一个软件(特别是Java软件)项目管理及自动构建工具,由Apache软件基金会所提供。Maven也可被用于构建和管理各种项目,例如C#,Ruby,Scala和其他语言编写的项目。(维基百科)
安装
MacOS
配置
配置本地仓库路径
- 默认本地仓库路径
- Windows:
/Users/用户名/.m2/repository
- Linux、Mac:
~/.m2/repository
conf/settings.xml1
2
3
| <settings>
<localRepository>本地仓库路径</localRepository>
</settings>
|
配置镜像服务器(可选)
阿里云
conf/settings.xml1
2
3
4
5
6
7
8
| <mirrors>
<mirror>
<id>alimaven</id>
<name>aliyun maven</name>
<url>http://maven.aliyun.com/nexus/content/groups/public/</url>
<mirrorOf>central</mirrorOf>
</mirror>
</mirrors>
|
配置网络代理(可选)
<id>:自定义id
<active>:激活状态
<protocol>:代理协议
<username>:代理用户名认证(不需要认证可不填)
<password>:代理密码认证(不需要认证可不填)
<host>:代理的IP地址
<port>:代理的端口号
<nonProxyHost>:不需要代理的主机(没有可不填),多个主机用|隔开
conf/settings.xml1
2
3
4
5
6
7
8
9
10
11
12
| <proxies>
<proxy>
<id>optional</id>
<active>true</active>
<protocol>http</protocol>
<username></username>
<password></password>
<host>proxy.host.net</host>
<port>80</port>
<nonProxyHosts></nonProxyHosts>
<proxy>
</proxies>
|
配置Maven使用的JDK版本
conf/settings.cml1
2
3
4
5
6
7
8
9
10
11
12
13
14
| <profiles>
<profile>
<id>development</id>
<activation>
<jdk>1.8</jdk>
<activeByDefault>true</activeByDefault>
</activation>
<properties>
<maven.compiler.source>1.8</maven.compiler.source>
<maven.compiler.target>1.8</maven.compiler.target>
<maven.compiler.compilerVersion>1.8</maven.compiler.compilerVersion>
</properties>
</profile>
</profiles>
|
利用Maven管理Java项目依赖
<groupId></groupId>:填写组名
<artifactId></artifactId>:填写类名
<version></version>:填写版本
<scope></scope>:填写范围(可选)
pom.xml1
2
3
4
5
6
7
8
9
10
| <dependencies>
<dependency>
<groupId></groupId>
<artifactId></artifactId>
<version></version>
<scope>provided</scope>
</dependency>
</dependencies>
|
依赖范围
| 依赖范围 |
编译 |
测试 |
运行 |
compile(缺省值) |
✅ |
✅ |
✅ |
test |
|
✅ |
|
provided |
✅ |
✅ |
|
runtime |
|
✅ |
✅ |
system |
✅ |
✅ |
|
import:Maven2.0.9之后新增的范围,只能用在中,并且导入的type为pom类型的父工程配置,一般用来解决多继承问题。
手动查找依赖
利用Maven打包Java项目
编译
清理
打包
测试
安装
Maven的生命周期
- maven在执行当前命令之前,会依次执行之前的生命周期命令
1
| complie->test->package->install
|
依赖传递
- 在多级依赖中,直接引入的依赖被称为直接依赖,由其他依赖引入的依赖被称为间接依赖,依赖具有传递行
依赖冲突
- 当相同一个
pom.xml文件中,引入了多个版本的相同依赖时,默认以版本最高的依赖为准
- 当多级的
pom.xml文件中,不同级别不同文件中引入了多个版本相同依赖时,层级越深优先级越低,层级越浅优先级越高
- 当多级的
pom.xml文件中,相同级别不同文件中引入了多个版本相同依赖时,先配置的优先级高,后配置的优先级低
隐藏依赖
- 隐藏依赖是指不想被别人引用的依赖,隐藏后的依赖不具有传递性
- 通过
<optional></optional>定义的依赖将被隐藏
- 与排除依赖的区别:隐藏依赖是不想被别人引用的依赖,才会被定义为隐藏依赖
pom.xml1
2
3
4
5
6
| <dependency>
<groupId></groupId>
<artifactId></artifactId>
<version></version>
<optional>true</optional>
</dependency>
|
排除依赖
- 排除依赖是指在当前引用的依赖中去除部分子依赖
- 通过
<exclusion></exclusion>定义的依赖将被排除,不需要指定版本
- 与隐藏依赖的区别:排除依赖是引入别人的依赖后,不想使用的子依赖才被定义为排除依赖
1
2
3
4
5
6
7
8
9
10
11
| <dependency>
<groupId></groupId>
<artifactId></artifactId>
<version></version>
<exclusions>
<exclusion>
<groupId></groupId>
<artifactId></artifactId>
</exclusion>
</exclusions>
</dependency>
|
pom.xml中的属性
内置属性
获取项目根目录
Setting属性
查看所有可获取的属性
系统属性和环境变量属性
查看所有可获取的属性
自定义属性
自定义属性的定义
在pom.xml文件中定义属性
1
2
3
| <properties>
<属性名>属性值</属性名>
</properties>
|
自定义属性的使用
在pom.xml文件中使用属性
1
2
3
4
5
| <dependency>
<groupId>org.springframework</groupId>
<artifactId>spring-context</artifactId>
<version>${属性名}</version>
</dependency>
|
在资源文件目录下使用属性
添加配置
- 为了使Maven中定义的自定义属性可以被资源文件目录下的配置文件访问而做的额外配置
为Properties添加的额外配置
<directory></directory>:通过相对路径指定被pom.xml文件管理的properties文件目录
<filtering>true</filtering>:开启过滤规则
${project.basedir}:项目根目录的内置属性
pom.xml1
2
3
4
5
6
7
8
| <build>
<resources>
<resource>
<directory>${project.basedir}/src/main/resources</directory>
<filtering>true</filtering>
</resource>
</resources>
</build>
|
为Yaml添加的额外配置
pom.xml1
2
3
4
5
6
7
8
9
10
11
12
13
| <build>
<plugins>
<plugin>
<groupId>org.apache.maven.plugins</groupId>
<artifactId>maven-resources-plugin</artifactId>
<version>2.6</version>
<configuration>
<encoding>UTF-8</encoding>
<useDefaultDelimiters>true</useDefaultDelimiters>
</configuration>
</plugin>
</plugins>
</build>
|
使用属性
src/main/resources/jdbc.properties
src/main/resources/jdbc.yml
Maven多环境配置
- Maven可以设置多种环境,可以通过
<activeByDefault>true</activeByDefault>参数指定作为当前使用的属性
- 在不同的环境下,可以定义很多自定义属性,在定义依赖的版本时,可以通过引用自定义属性,从而实现跟随不同的环境改变依赖的版本
定义多环境配置
- 每一组
<profile></profile>用来配置一个环境
- 可以在某一个环境中添加
<activation><activeByDefault>true</activeByDefault></activation>配置,用来指定当前使用的配置
- 在每一个环境中可以通过
<properties></properties>添加多个自定义属性
pom.xml1
2
3
4
5
6
7
8
9
10
11
12
13
14
15
16
17
18
19
20
21
22
23
24
25
26
| <profiles>
<profile>
<id>dev</id>
<properties>
  <属性名>属性值</属性名>
</properties>
<activation>
<activeByDefault>true</activeByDefault>
</activation>
</profile>
<profile>
<id>pro</id>
<properties>
<属性名>属性值</属性名>
</properties>
</profile>
<profile>
<id>test</id>
<properties>
<属性名>属性值</属性名>
</properties>
</profile>
</profiles>
|
使用多环境配置
- 拥有多环境配置的Maven项目,可以在执行生命周期时指定环境的id,实现环境的切换
-P 环境id:指定环境id
版本管理
- 快照版本:SNAPSHOT
- 发布版本:RELEASE
执行生命周期时跳过测试
通过命令
通过编辑器插件
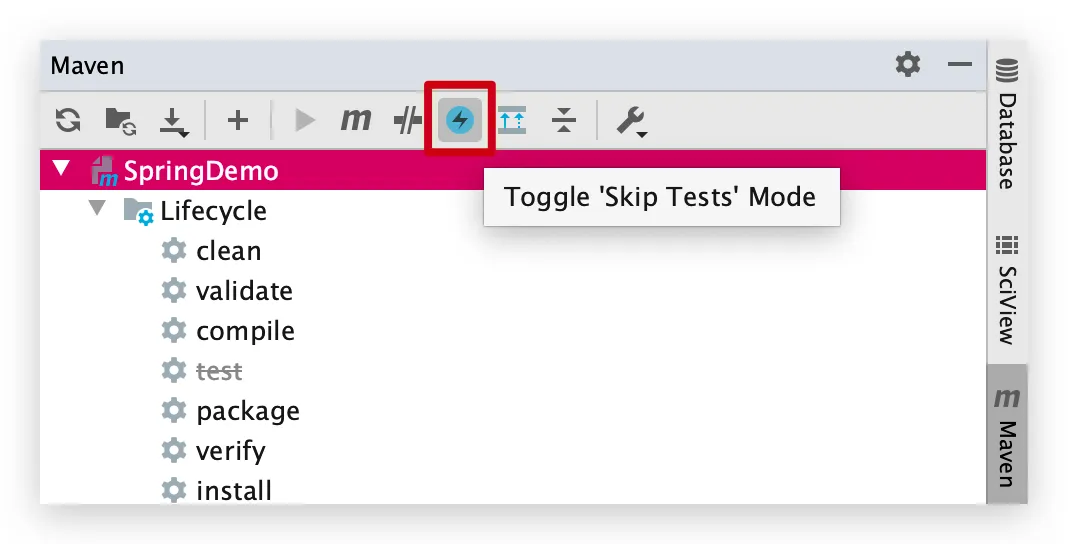
通过Maven插件
跳过所有测试(粗粒度)
pom.xml1
2
3
4
5
6
7
8
9
10
11
12
| <build>
<plugins>
<plugin>
<groupId>org.apache.maven.plugins</groupId>
<artifactId>maven-surefire-plugin</artifactId>
<version>2.12.4</version>
<configuration>
<skipTests>true</skipTests>
</configuration>
</plugin>
</plugins>
</build>
|
跳过指定测试(细粒度)
指定不跳过编译的测试类
- 在所有测试全部跳过的前提下,指定不跳过编译的测试类
<includes><include></include></includes>:指定不跳过编译的测试类
pom.xml1
2
3
4
5
6
7
8
9
10
11
12
13
14
15
16
| <build>
<plugins>
<plugin>
<groupId>org.apache.maven.plugins</groupId>
<artifactId>maven-surefire-plugin</artifactId>
<version>2.12.4</version>
<configuration>
<skipTests>true</skipTests>
<includes>
<include>**/Tests.java</include>
</includes>
</configuration>
</plugin>
</plugins>
</build>
|
指定跳过编译的测试类
<excludes><exclude></exclude></excludes>:指定跳过编译的测试类
pom.xml1
2
3
4
5
6
7
8
9
10
11
12
13
14
15
16
| <build>
<plugins>
<plugin>
<groupId>org.apache.maven.plugins</groupId>
<artifactId>maven-surefire-plugin</artifactId>
<version>2.12.4</version>
<configuration>
<skipTests>false</skipTests>
<excludes>
<exclude>**/Tests.java</exclude>
</excludes>
</configuration>
</plugin>
</plugins>
</build>
|
完成
参考文献
哔哩哔哩——黑马程序员
博客园——Memory4Young