116202943129995442
前言
通过GithubActions实现自动化部署Hexo到GithubPage
配置SSH密钥对
- 将Hexo工作目录和Hexo站点目录分别push到2个Github仓库(Hexo工作目录仓库可以设置为private)
生成一个SSH密钥对
- 生成一个SSH密钥对,用于从Hexo工作目录Github仓库
hexo d到Hexo站点目录Github仓库
1
| ssh-keygen -t rsa -b 4096 -C "Hexo Deploy Key" -f github-deploy-key -N ""
|
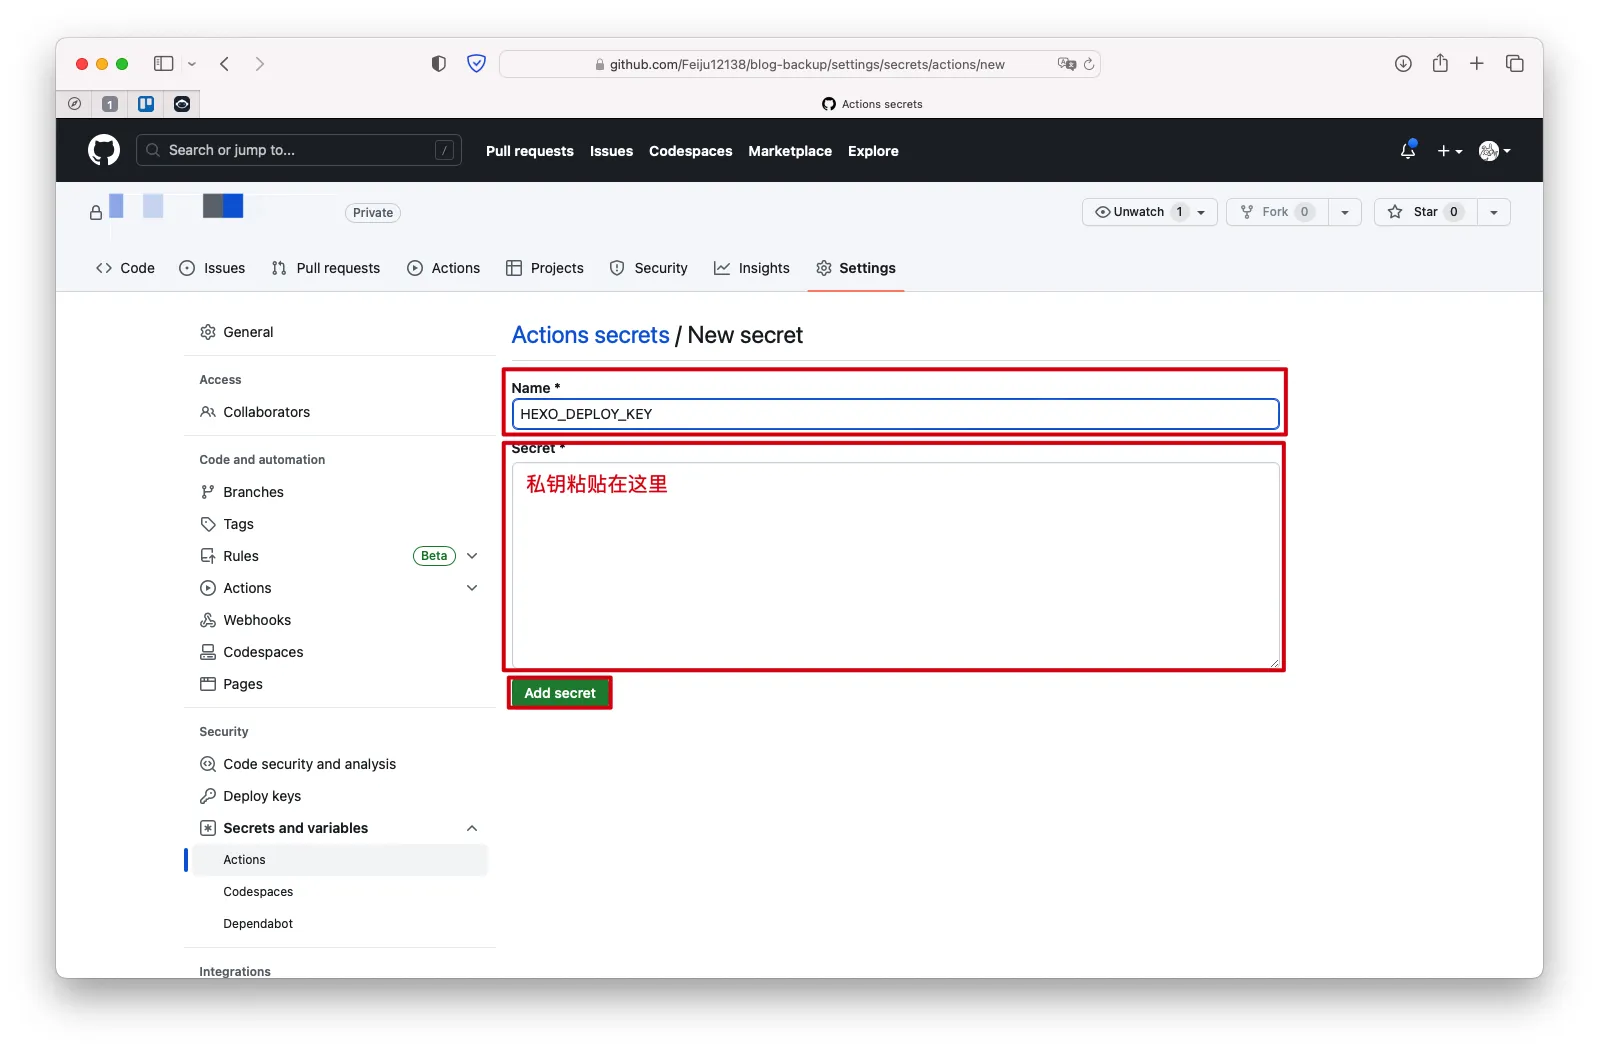
在Hexo工作目录Github仓库中指定私钥
Settings->Secrets and variables->Actions->Secrets->New repository secret
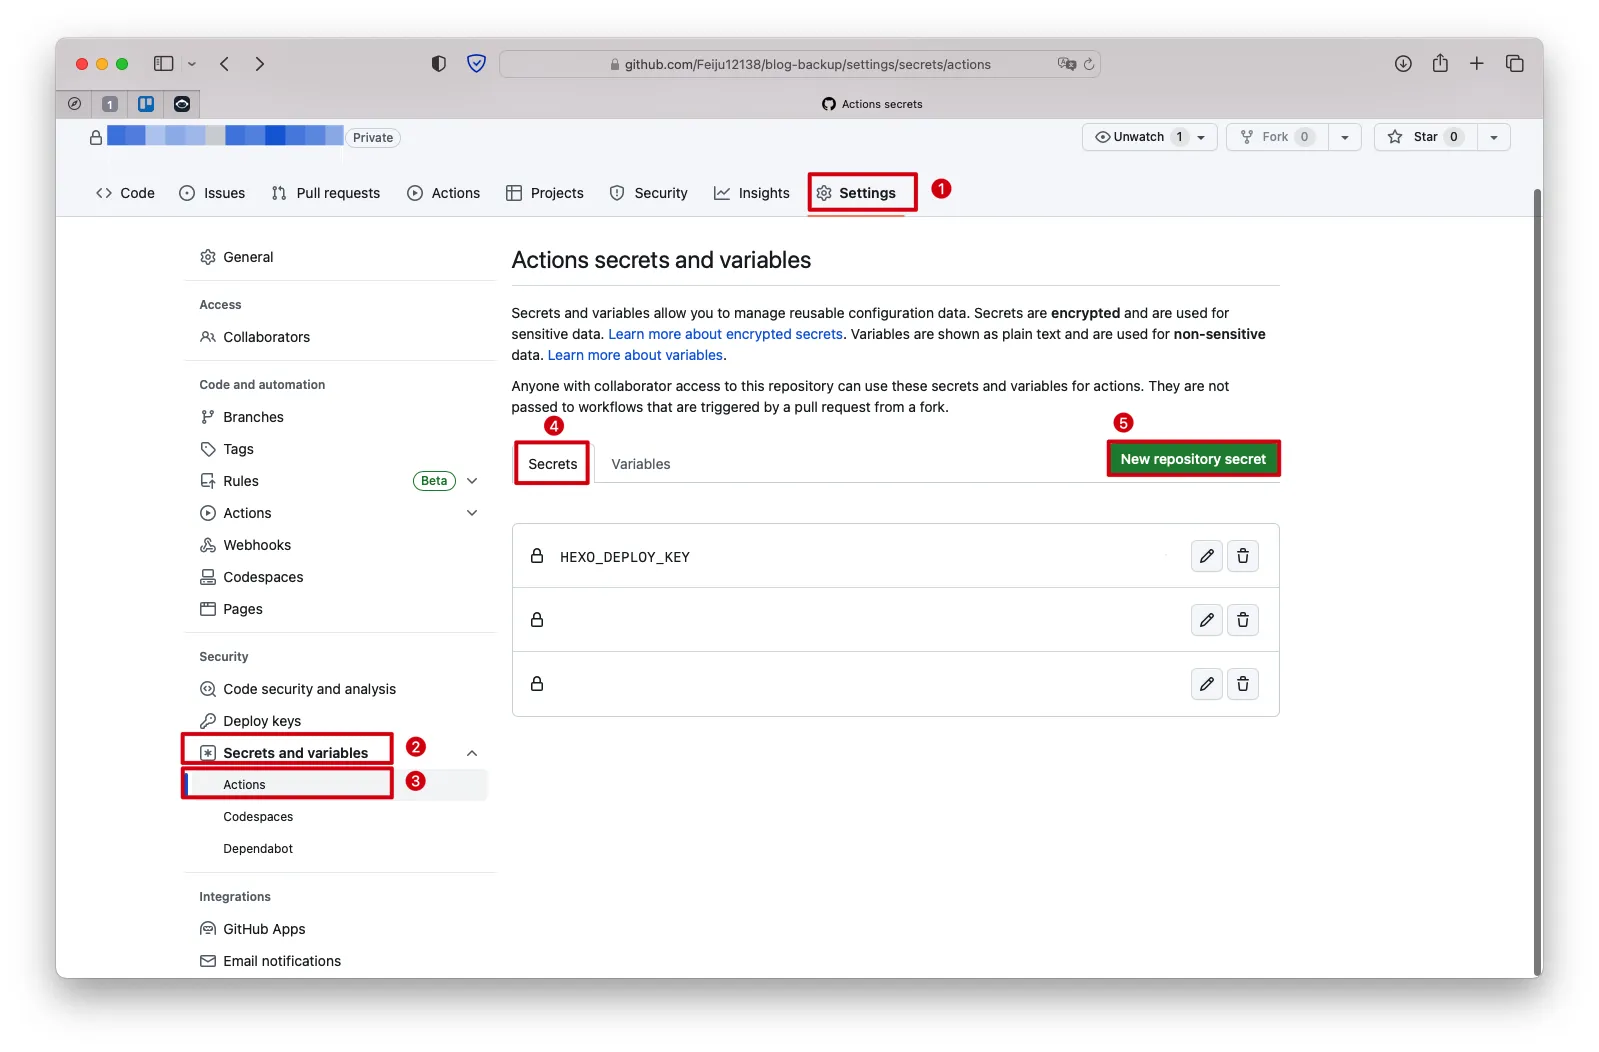
Name填写Actions变量名->secret填写Actions变量值
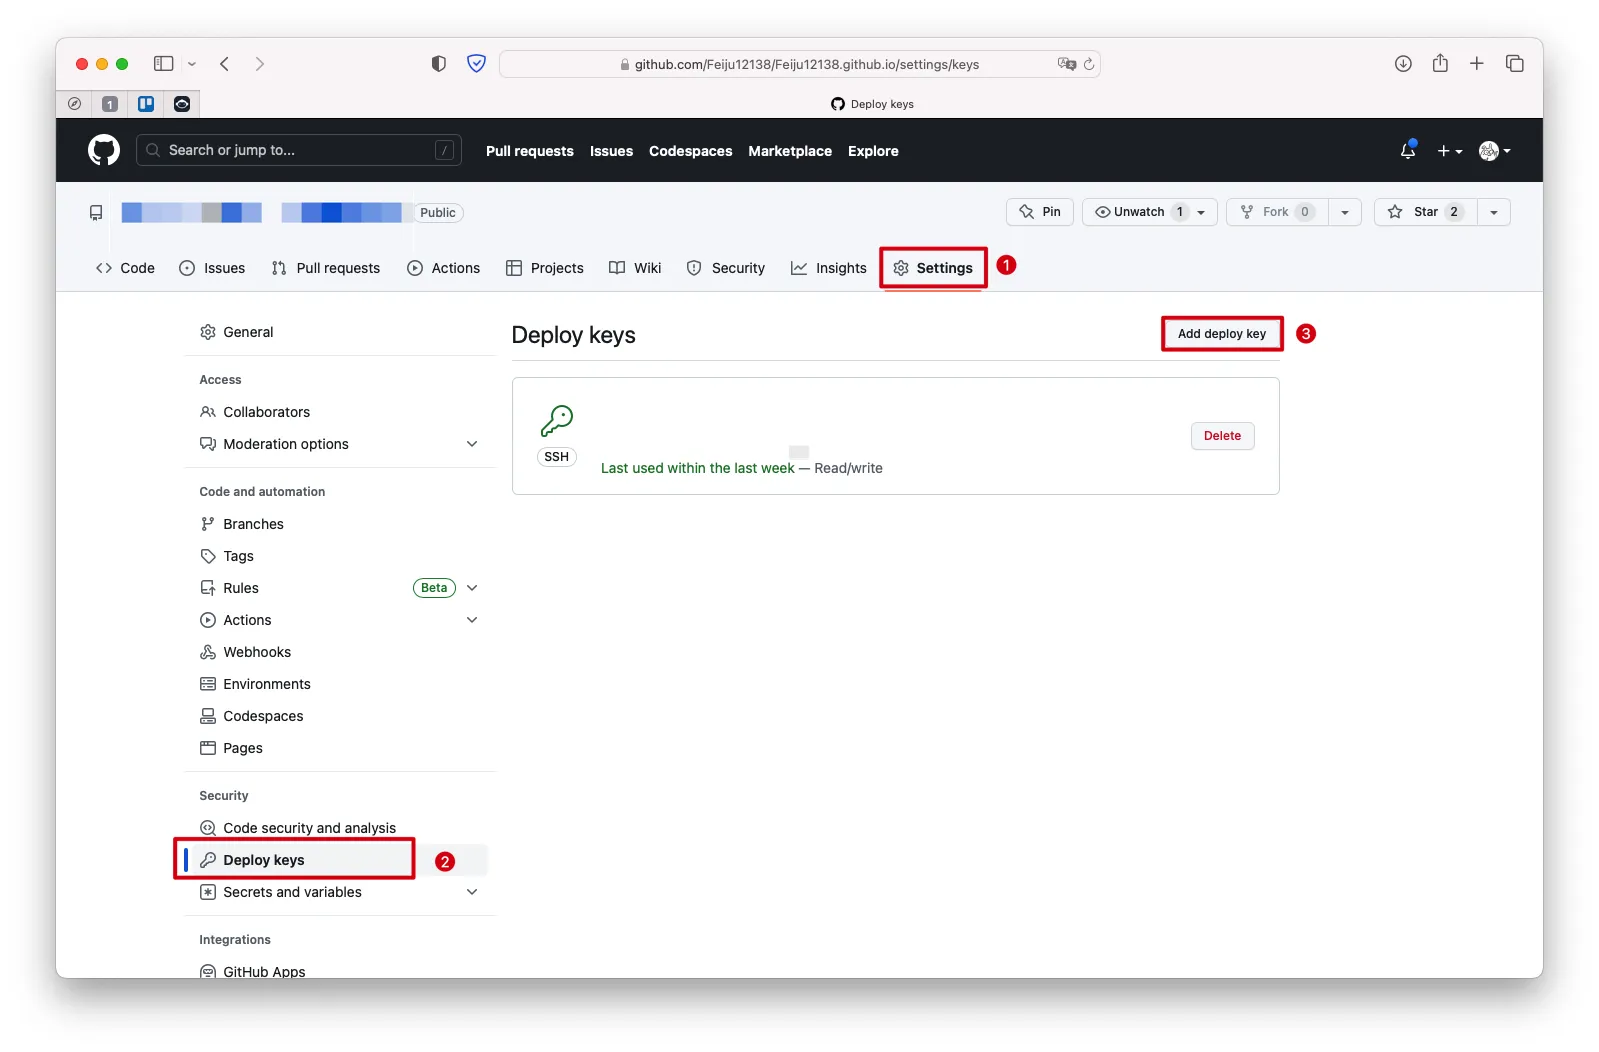
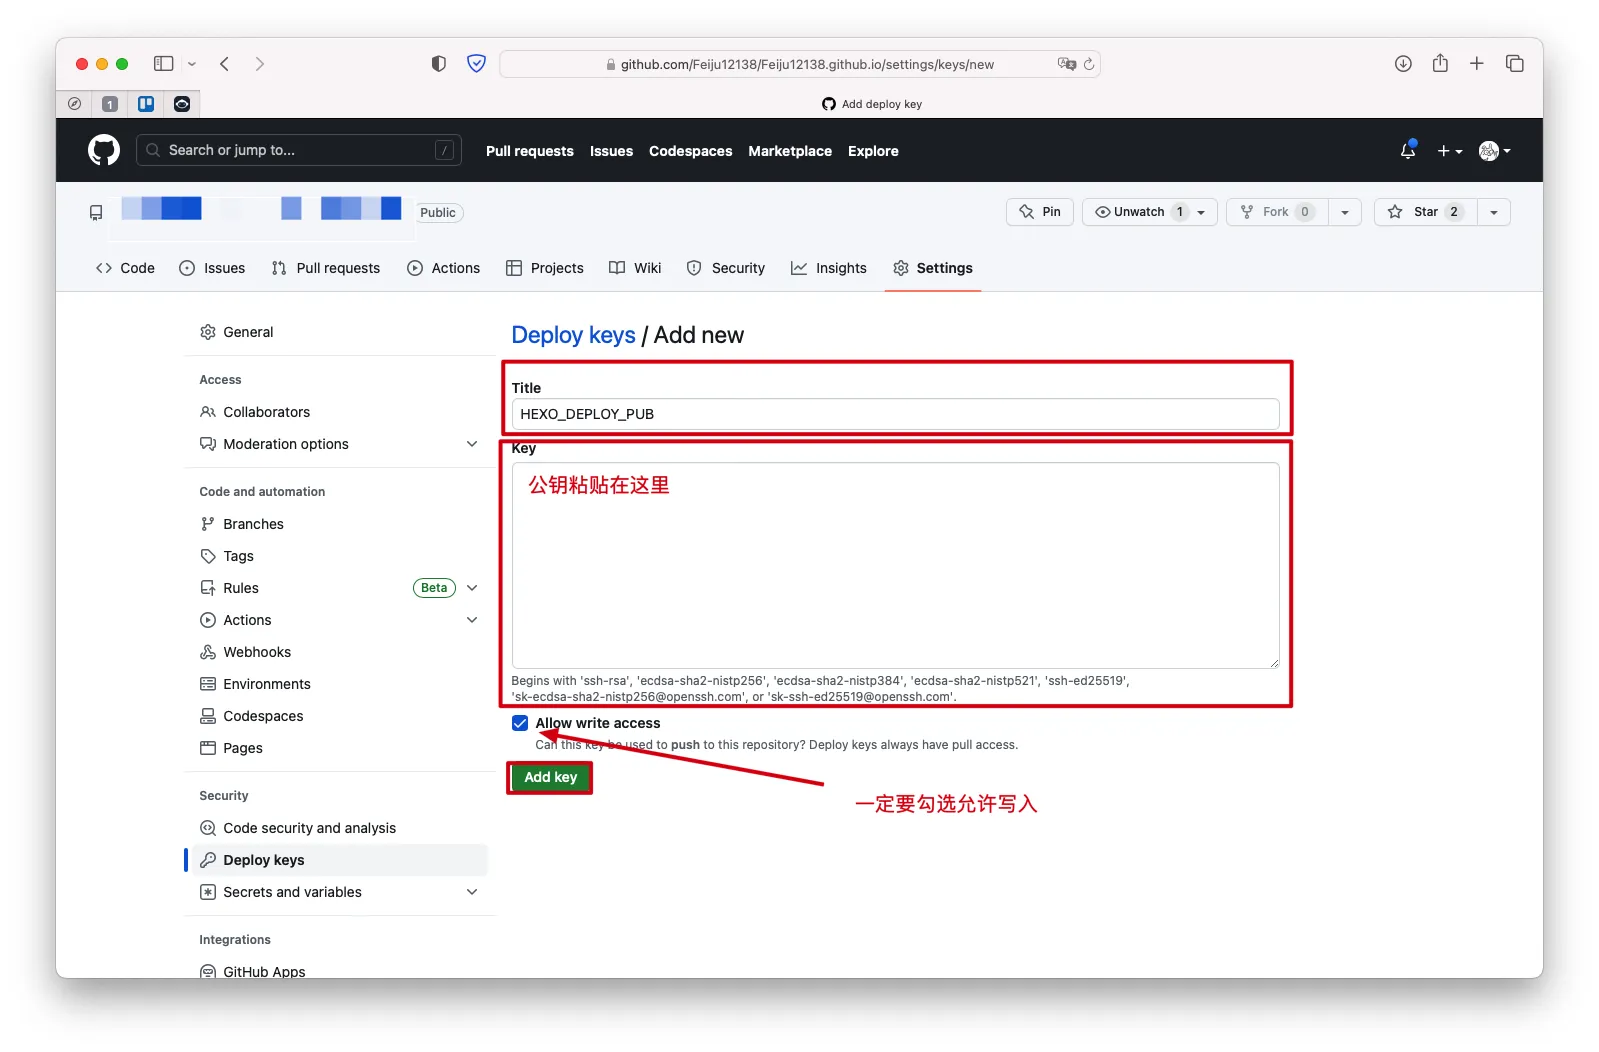
在Hexo站点目录Github仓库中指定公钥
创建部署配置
- 创建存放部署配置的目录和部署配置文件,文件名任意,文件格式为
Yaml
1
2
| mkdir -p ./.github/workflows/
touch ./.github/workflows/main.yml
|
git config --global user.email "":配置你Git身份的邮箱
git config --global user.name "":配置你Git身份的用户名
name:指定部署配置名
on:指定触发部署的条件
on.push.branches=["master"]:指定在push到分支master时触发部署
on=["push"]:指定在push操作时触发部署
jobs:部署指定任务
HexoDeploy:部署名,可以自定义
runs-on:部署的起始容器
steps:部署步骤
uses:从其他Github仓库中调取部署脚本执行,actions为Github官方的部署脚本仓库,其中有一些常用的部署环境
name:具体步骤名
secrets.:Github仓库Secret中的变量
run:当前步骤执行的Shell命令,通过|可以在下一行开始逐行定义每个Shell命令,而无需反复使用- run
./.github/workflows/main.yml1
2
3
4
5
6
7
8
9
10
11
12
13
14
15
16
17
18
19
20
21
22
23
24
25
26
27
28
29
30
31
32
33
34
35
36
37
| name: 部署 Hexo 到 GithubPage
on:
push:
branches: [ "master" ]
jobs:
HexoDeploy:
runs-on: ubuntu-latest
strategy:
matrix:
node-version: [18.x]
steps:
- uses: actions/checkout@v3
- name: 使用 Node.js ${{ matrix.node-version }} 环境
uses: actions/setup-node@v3
with:
node-version: ${{ matrix.node-version }}
- name: 配置 SSH 环境和 Git 环境
env:
ACTION_DEPLOY_KEY: ${{ secrets.HEXO_DEPLOY_KEY }}
run: |
mkdir -p ~/.ssh/
echo "$ACTION_DEPLOY_KEY" > ~/.ssh/id_rsa
chmod 700 ~/.ssh
chmod 600 ~/.ssh/id_rsa
ssh-keyscan github.com >> ~/.ssh/known_hosts
git config --global user.email ""
git config --global user.name ""
- name: 配置 Hexo 环境
run: |
export TZ='Asia/Shanghai'
npm install hexo-cli -g
- name: 下载 npm 依赖
run: |
npm install
- name: 部署博客
run: |
hexo d
|
通过tccli刷新和预热腾讯云CDN缓存(可选)
- 因为TCCLI工具可以操作腾讯云CDN产品,可以通过GithubActions自动进行缓存刷新和缓存预热
传送门
- 通过编写Python脚本自动抓取
sitemap.txt站点地图所提及的所有URL,并将所列的URL中非文章之外的URL进行腾讯云CDN预热
编写自动预热脚本
- 使用前需先将
site配置为自己的站点根路径、将site_map配置为站点地图路径
1
2
3
4
5
6
7
8
9
10
11
12
13
14
15
16
17
18
19
20
21
22
23
24
25
26
27
28
29
30
31
32
33
34
35
36
37
38
39
40
41
42
43
44
| import os
import re
import requests
site = "https://loli.fj.cn"
site_map = f"{site}/sitemap.txt"
result_url = []
context = requests.get(f"{site_map}").text
lines = context.split("\n")
for line in lines:
text = re.findall("http.*?/\\d{4}/\\d{2}/\\d{2}/", line)
if len(text) == 0:
result_url.append(line)
print("已将", line, "添加到CDN预热列表")
result_command = "tccli cdn PushUrlsCache --Urls '["
for i in range(len(result_url)):
if result_url[i] == "":
continue
if i != 0:
result_command += ','
result_command += '"'
result_command += result_url[i]
result_command += '"'
result_command += "]'"
print(f"== 总计将{len(result_url)}条数据添加到CDN预热列表 ==")
print("== 刷新站点根目录 ==")
cmd = f"tccli cdn PurgePathCache --Paths '[\"{site}/\"]' --FlushType delete"
res = os.popen(cmd)
print(cmd)
print(res.read())
print("== 生成缓存预热 ==")
res = os.popen(result_command)
print(result_command)
print(res.read())
print("== 脚本执行完成 ==")
|
部署GithubActions配置
- 获取腾讯云SecretId和SecretKey
传送门
- 在Hexo工作目录添加Actions变量
传送门
TCCLI_API_SECRET_ID:腾讯云SecretId
TCCLI_API_SECRET_KEY:腾讯云SecretKey
1
2
3
4
5
6
7
8
9
10
11
12
13
14
15
16
17
18
19
20
21
22
23
24
25
26
27
28
29
30
31
32
33
34
35
36
37
38
39
40
41
42
43
44
45
46
47
48
49
50
51
52
53
54
| name: 部署 Hexo 到 GithubPage
on:
push:
branches: [ "master" ]
jobs:
HexoDeploy:
runs-on: ubuntu-latest
strategy:
matrix:
node-version: [18.x]
steps:
- uses: actions/checkout@v3
- name: 使用 Node.js ${{ matrix.node-version }} 环境
uses: actions/setup-node@v3
with:
node-version: ${{ matrix.node-version }}
- name: 配置 SSH 环境和 Git 环境
env:
ACTION_DEPLOY_KEY: ${{ secrets.HEXO_DEPLOY_KEY }}
run: |
mkdir -p ~/.ssh/
echo "$ACTION_DEPLOY_KEY" > ~/.ssh/id_rsa
chmod 700 ~/.ssh
chmod 600 ~/.ssh/id_rsa
ssh-keyscan github.com >> ~/.ssh/known_hosts
git config --global user.email "xxx@example.com"
git config --global user.name "FeiJu By Github Actions"
- name: 配置 Hexo 环境
run: |
export TZ='Asia/Shanghai'
npm install hexo-cli -g
- name: 下载 npm 依赖
run: |
npm install
- name: 部署博客
run: |
hexo d
- uses: actions/checkout@v3
- name: 使用 Python 3.x 环境
uses: actions/setup-python@v3
with:
python-version: '3.x'
- name: 配置 腾讯云CLI 环境
env:
TCCLI_API_SECRET_ID: ${{ secrets.TCCLI_API_SECRET_ID }}
TCCLI_API_SECRET_KEY: ${{ secrets.TCCLI_API_SECRET_KEY }}
run: |
python -m pip install --upgrade pip
pip install tccli
tccli configure set secretId $TCCLI_API_SECRET_ID
tccli configure set secretKey $TCCLI_API_SECRET_KEY
- name: 腾讯云CDN缓存预热
run: |
python source/scripts/TencentCloudCDNCacheWarmUp.py
|
完成
参考文献
哔哩哔哩——free-coder
知乎——Tommy
CSDN——CDFMLR